How to create a collaborative to-do list with React and Liveblocks

In this 15-minute tutorial, we’ll be building a collaborative to-do list using React and Liveblocks. As users edit the list, changes will be automatically synced and persisted, allowing for a list that updates in real-time across clients. Users will also be able to see who else is currently online, and when another user is typing.

This guide assumes that you’re already familiar with React, Next.js and TypeScript. If you’re using a state-management library such as Redux or Zustand, we recommend reading one of our dedicated to-do list tutorials:

The source code for this guide is available on GitHub.

Install Liveblocks into your project

Install Liveblocks packages

Create a new app with create-next-app:

$npx create-next-app@latest next-todo-list --typescript

Then run the following command to install the Liveblocks packages:

$npm install @liveblocks/client @liveblocks/react

Connect to Liveblocks servers

In order to use Liveblocks, we’ll need to sign up and get an API key. Create an account, then navigate to the dashboard to find your public key (it starts with pk_).

Let’s now add a new file liveblocks.config.ts at the root of your app to create a Liveblocks client, using the public key as shown below.

liveblocks.config.ts
import { createClient } from "@liveblocks/client";
const client = createClient({ publicApiKey: "",});

Connect to a Liveblocks room

Liveblocks uses the concept of rooms, separate virtual spaces where people can collaborate. To create a collaborative experience, multiple users must be connected to the same room.

Instead of using the client directly, we’re going to use createRoomContext from @liveblocks/react to create a RoomProvider and hooks to make it easy to consume from our components.

liveblocks.config.ts
import { createClient } from "@liveblocks/client";import { createRoomContext } from "@liveblocks/react";
const client = createClient({ publicApiKey: "",});
export const { suspense: { RoomProvider },} = createRoomContext(client);

You might be wondering why we’re creating our Providers and Hooks with createRoomContext instead of importing them directly from @liveblocks/client. This allows TypeScript users to define their Liveblocks types once in one unique location—providing a helpful autocompletion experience when using those hooks elsewhere.

We can now import the RoomProvider directly from our liveblocks.config.ts file. Every component wrapped inside RoomProvider will have access to the React hooks we’ll be using to interact with this room.

pages/index.tsx
import { RoomProvider } from "@/liveblocks.config";
export default function Page() { return ( <RoomProvider id={"nextjs-todo-list"} initialPresence={{}}> {/* ... */} </RoomProvider> );}

You may also notice that we’re exporting the suspense version of our hooks in liveblocks.config.ts. Because Next.js uses server-side rendering by default, we must wrap RoomProvider children in our ClientSideSuspense component. Liveblocks does not connect through WebSocket when running on server, so ClientSideSuspense ensure its children are not rendered on the server. More information can be found here.

pages/index.tsx
import { ClientSideSuspense } from "@liveblocks/react";import { RoomProvider } from "@/liveblocks.config";
export default function Page() { return ( <RoomProvider id={"nextjs-todo-list"} initialPresence={{}}> <ClientSideSuspense fallback={<div>Loading...</div>}> {() => <TodoList />} </ClientSideSuspense> </RoomProvider> );}
function TodoList() { return ( <div> {/* We’re starting to implement the to-do list in the next section */} </div> );}

Show who’s currently in the room

Now that Liveblocks is set up, we can start using the hooks to display how many users are currently online.

We’ll be doing this by adding useOthers, a selector hook that provides us information about which other users are online. First, let’s re-export it from liveblocks.config.ts. Because we’re using Suspense, we’ll be exporting all our hooks from the suspense property.

liveblocks.config.ts
//...
export const { suspense: { RoomProvider, useOthers, // 👈 },} = createRoomContext(client);

useOthers takes a selector function that receives an array, others, containing information about each user. We can get the current user count from the length of that array. Add the following code to pages/index.tsx, and open your app in multiple windows to see it in action.

pages/index.tsx
import { ClientSideSuspense } from "@liveblocks/react";import { RoomProvider, useOthers } from "@/liveblocks.config";
function WhoIsHere() { const userCount = useOthers((others) => others.length);
return ( <div className="who_is_here">There are {userCount} other users online</div> );}
function TodoList() { return ( <div className="container"> <WhoIsHere /> </div> );}
/* Page */

For a tidier UI, replace the content of styles/globals.css file with the following css.

Show if someone is typing

Next, we’ll add some code to show a message when another user is typing.

Any online user could start typing, and we need to keep track of this, so it’s best if each user holds their own isTyping property.

Luckily, Liveblocks uses the concept of presence to handle these temporary states. A user’s presence can be used to represent the position of a cursor on screen, the selected shape in a design tool, or in this case, if they’re currently typing or not.

Let’s define a new type Presence with the property isTyping in liveblocks.config.ts to ensure all our presence hooks are typed properly.

We can use the useUpdateMyPresence hook to change with the current user’s presence. But first, let’s re-export it from liveblocks.config.ts like we did previously with useOthers.

liveblocks.config.ts
// ...
type Presence = { isTyping: boolean;};
export const { suspense: { RoomProvider, useOthers, useUpdateMyPresence, // 👈 },} = createRoomContext<Presence>(client); // 👈

We can then call updateMyPresence whenever we wish to update the user’s current presence, in this case whether they’re typing or not.

pages/index.tsx
import { ClientSideSuspense } from "@liveblocks/react";import {  RoomProvider,  useOthers,  useUpdateMyPresence,} from "@/liveblocks.config";import { useState } from "react";
/* WhoIsHere */
function TodoList() { const [draft, setDraft] = useState(""); const updateMyPresence = useUpdateMyPresence();
return ( <div className="container"> <WhoIsHere /> <input type="text" placeholder="What needs to be done?" value={draft} onChange={(e) => { setDraft(e.target.value); updateMyPresence({ isTyping: true }); }} onKeyDown={(e) => { if (e.key === "Enter") { updateMyPresence({ isTyping: false }); setDraft(""); } }} onBlur={() => updateMyPresence({ isTyping: false })} /> </div> );}
/* Page */

Now that we’re keeping track of everyone’s state, we can create a new component called SomeoneIsTyping, and use this to display a message whilst anyone else is typing. To check if anyone is typing, we’re iterating through others and returning true if isTyping is true for any user.

pages/index.tsx
import { ClientSideSuspense } from "@liveblocks/react";import {  RoomProvider,  useOthers,  useUpdateMyPresence,} from "@/liveblocks.config";import { useState } from "react";
/* WhoIsHere */
function SomeoneIsTyping() { const someoneIsTyping = useOthers((others) => others.some((other) => other.presence.isTyping) );
return ( <div className="someone_is_typing"> {someoneIsTyping ? "Someone is typing..." : ""} </div> );}
function TodoList() { const [draft, setDraft] = useState(""); const updateMyPresence = useUpdateMyPresence();
return ( <div className="container"> <WhoIsHere /> <input {/* ... */ } /> <SomeoneIsTyping /> </div> );}
/* Page */

We also need to make sure that we pass an initialPresence for isTyping to RoomProvider.

pages/index.tsx
/* WhoIsHere *//* SomeoneIsTyping *//* TodoList */
export default function Page() { return ( <RoomProvider id="next-todo-list" initialPresence={{ isTyping: false }}> {/* ... */} </RoomProvider> );}

Sync and persist to-dos

To-do list items will be stored even after all users disconnect, so we won’t be using presence to store these values. For this, we need something new.

We’re going to use a LiveList to store the list of todos inside the room’s storage, a type of storage that Liveblocks provides. A LiveList is similar to a JavaScript array, but its items are synced in real-time across different clients. Even if multiple users insert, delete, or move items simultaneously, the LiveList will still be consistent for all users in the room.

First, let's declare a new type Storage in liveblocks.config.ts, like we did for Presence. This will ensure that our storage hooks are properly typed.

liveblocks.config.ts
import { createClient, LiveList } from "@liveblocks/client";
// ...
type Storage = { todos: LiveList<{ text: string }>;};
export const { suspense: { /* ... */ },} = createRoomContext<Presence, Storage>(client); // 👈

Go back to Page to initialize the storage with the initialStorage prop on the RoomProvider.

pages/index.tsx
/* ... */
import { LiveList } from "@liveblocks/client";
/* WhoIsHere *//* SomeoneIsTyping *//* TodoList */
export default function Page() { return ( <RoomProvider id="react-todo-app" initialPresence={{ isTyping: false }} initialStorage={{ todos: new LiveList() }} > {/* ... */} </RoomProvider> );}

Accessing storage

We’re going to use the useStorage hook to get the list of todos previously created. And once again, we’ll need to first re-export it from your liveblocks.config.

liveblocks.config.ts
// ...
export const { suspense: { RoomProvider, useOthers, useStorage, // 👈 useUpdateMyPresence, },} = createRoomContext<Presence, Storage>(client);

useStorage allows us to select part of the storage from the root level. We can find our todos LiveList at root.todos, and we can map through our list to display each item.

pages/index.tsx
import { ClientSideSuspense } from "@liveblocks/react";import {  RoomProvider,  useOthers,  useUpdateMyPresence,  useStorage} from "@/liveblocks.config";import { useState } from "react";import { LiveList } from "@liveblocks/client";
/* WhoIsHere *//* SomeoneIsTyping */
function TodoList() { const [draft, setDraft] = useState(""); const updateMyPresence = useUpdateMyPresence(); const todos = useStorage((root) => root.todos);
return ( <div className="container"> <WhoIsHere /> <input {/* ... */} onKeyDown={(e) => { if (e.key === "Enter") { updateMyPresence({ isTyping: false }); setDraft(""); } }} /> <SomeoneIsTyping /> {todos.map((todo, index) => { return ( <div key={index} className="todo_container"> <div className="todo">{todo.text}</div> <button className="delete_button" > </button> </div> ); })} </div> );}
/* Page */

Setting storage

To modify the list, we can use the useMutation hook. This is a hook that works similarly to useCallback, with a dependency array, allowing you to create a reusable storage mutation. Before we use this, first we need to re-export this from liveblocks.config.ts.

liveblocks.config.ts
// ...
export const { suspense: { RoomProvider, useMutation, // 👈 useOthers, useStorage, useUpdateMyPresence, },} = createRoomContext<Presence, Storage>(client);

useMutation gives you access to the storage root, a LiveObject. From here we can use LiveObject.get to retrieve the todos list, then use LiveList.push and LiveList.delete to modify our todo list. These functions are then passed into the appropriate events.

pages/index.tsx
import { ClientSideSuspense } from "@liveblocks/react";import {  RoomProvider,  useOthers,  useUpdateMyPresence,  useStorage,  useMutation} from "@/liveblocks.config";import { useState } from "react";import { LiveList } from "@liveblocks/client";
/* WhoIsHere *//* SomeoneIsTyping */
export default function TodoList() { const [draft, setDraft] = useState(""); const updateMyPresence = useUpdateMyPresence(); const todos = useStorage((root) => root.todos);
const addTodo = useMutation(({ storage }, text) => { storage.get("todos").push({ text }) }, []);
const deleteTodo = useMutation(({ storage }, index) => { storage.get("todos").delete(index); }, []);
return ( <div className="container"> <WhoIsHere /> <input {/* ... */}
onKeyDown={(e) => { if (e.key === "Enter") { updateMyPresence({ isTyping: false }); addTodo(draft); setDraft(""); } }} /> <SomeoneIsTyping /> {todos.map((todo, index) => { return ( <div key={index} className="todo_container"> <div className="todo">{todo.text}</div>
<button className="delete_button" onClick={() => deleteTodo(index)} > </button>
</div> ); })} </div> );}
/* Page */

Voilà! We have a working collaborative to-do list, with persistent data storage.

Summary

In this tutorial, we’ve learnt about the concept of rooms, presence, and others. We’ve also learnt how to put all these into practice, and how to persist state using storage too.

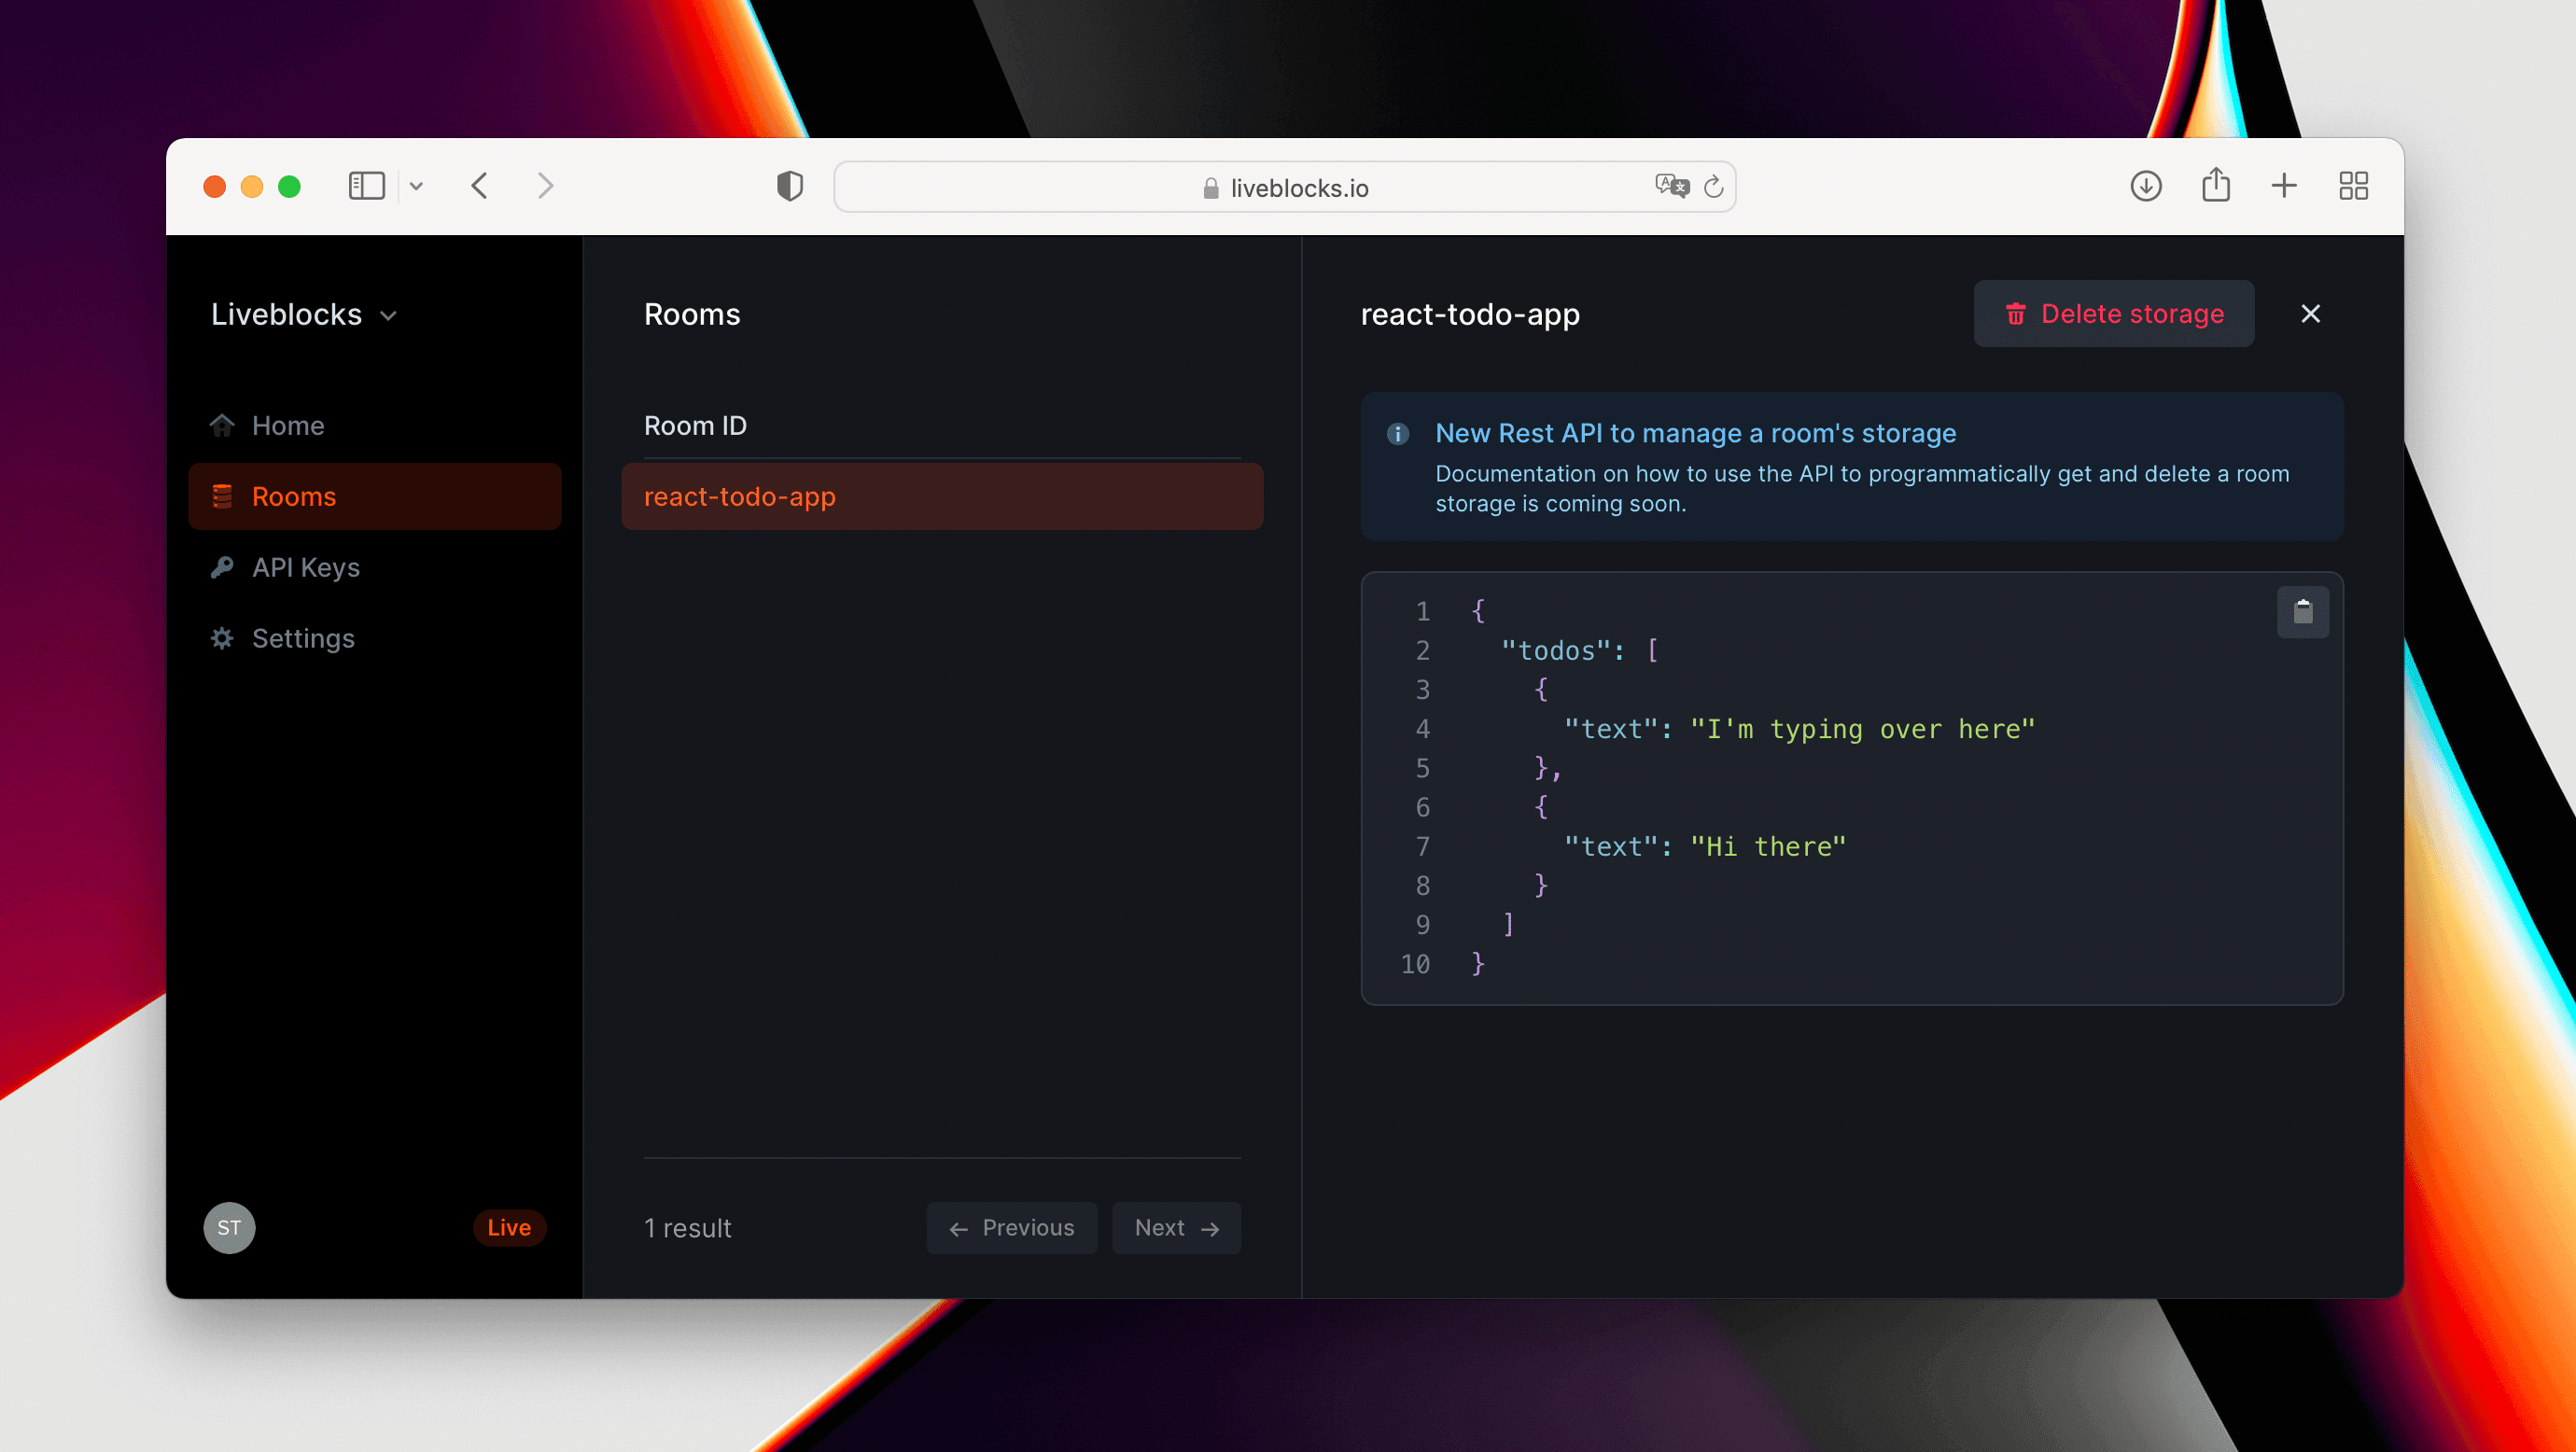
You can see some stats about the room you created in your dashboard.

Liveblocks dashboard

Next steps