Smoothly rendering live cursors is more difficult than it sounds when real‑world conditions are taken into account—here's a quick introduction to a few different methods, plus some React snippets.
Multiplayer cursors are becoming an increasingly common sight across all sorts
of collaborative tools, but have you ever wondered how they’re animated?
Animating realtime cursors is more complex than it first may seem, thanks to
network and connection limitations. Here’s a quick overview of a few different
methods, with some React snippets to get you started. Let’s dive in!
In an ideal world, animations wouldn’t be needed, and every single cursor
movement would be reflected immediately across browsers.
An interactive demo displaying a perfectly animated cursor.
You
Others
However, updates can’t be transmitted instantly, and realistically, we wouldn’t
want them to be. Even if updates were sent every millisecond (1ms), blinking
your eye still takes longer than 100ms—would it really be efficient to send 100
updates in such a short space of time?
Every realtime service will use some kind of throttling to ensure that your
code, and their systems, aren’t overloaded, and this is where our animation
problem lies. Try adjusting the throttle rate with the range slider below.
An interactive demo allowing you to change the update frequency of cursors.
You
Others
Lowering the throttle rate prevents updates being sent as regularly, and as you
can see, this results in the cursor animation only being completely smooth at
the lowest rates.
Of course in the real world, the cursor won’t update exactly on the throttle
rate (for example, 120ms) there'll be some slight variation between each update
caused by varying processing times on clients and server, as well as changing
network latency. The actual time between updates will be slightly different.
An diagram explaining that update time isn't just throttling.
Throttle rate (120ms)
Variation (5-15ms)
I’m going to call the actual time between updates the update rate, a value
that includes throttling, and other normal variations. If you’d like to see a
realistic update rate, try interacting with the demo below—it connects to
Liveblocks and manually measures the rate on each update.
A demo that displays your current update frequency and ping for Liveblocks
when interacted with.
This demo uses Liveblocks’ default throttle rate, but you can specify a custom
rate within
createClient.
Now we’ve seen the problem, let’s fix it. There are three different ways we can
tackle this: CSS transitions, spring animations, and spline animations.
In the React code examples below, we’ll be animating cursors by passing x and
y props to the component, these numbers corresponding to the pixel distance
from the top-left corner of the container.
The easiest approach to animate cursor locations is to use a CSS transition on
the cursor component which can be added with just a single CSS property,
transition.
An interactive demo displaying a cursor animated with CSS transitions.
You
Others
When you increase the update time, you’ll probably notice the most prominent
flaw with CSS transitions—the route to the next point is always a straight line.
CSS transitions only consider the cursor’s next coordinates, not the path taken
to get there, nor the momentum of the cursor.
If you move the slider in the diagram below, you can see the shape of the
original cursor’s movement alongside the path created by the transition. Each
"x" represents a new update that’s been received.
An interactive diagram showing the path taken by a CSS transition animated
cursor, alongside the original cursor's path.
Move slider
As you can see, each time an update is received, the transition starts pathing a
straight line directly towards the next update; certainly less than ideal.
When it comes to CSS timing functions, interestingly, and perhaps
counterintuitively, linear transitions result in smoother cursors than
easing transitions. Try enabling ease-in-out, then going back to linear:
An interactive demo displaying a cursor animated with CSS transitions.
You
Others
But how does that make sense? Transitions such as ease-in-out slow down
towards the start and end of each transition, but with cursors we don’t want
that—we want a similar speed maintained between updates. If the cursor slows
down on each update, before speeding up again, it won’t look as smooth. Using
linear ensures that a similar speed is maintained, and the shift to the next
set of coordinates is smoother.
I’d only recommend using CSS transitions if you’re after a lightweight solution
that doesn’t use any third-party packages. Here’s an example of a React
component that uses CSS transitions:
Rather than using straight-line CSS transitions, we can look to spring physics
to mimic more organic motion. Spring animations allow us to control aspects of
cursor movement such as stiffness and damping ratio, lending the appearance of a
real item moving with its own impetus and mass, resulting in a much more natural
movement.
An interactive demo displaying a cursor animated with springs.
You
Others
Spring animations tend to be far smoother than CSS transitions, as they take
into account not just the next coordinates, but also the current momentum of the
element.
An interactive diagram showing the path taken by a spring animated cursor,
alongside the original cursor's path.
Move slider
After each update, the cursor’s direction is smoothly changed before it paths a
straight-line to the next coordinates.
If you’re after smooth cursors with a quick response, and strict pathing
accuracy isn’t important, spring animations are the way to go. Here’s an example
of a spring-animated React cursor built with
Framer Motion.
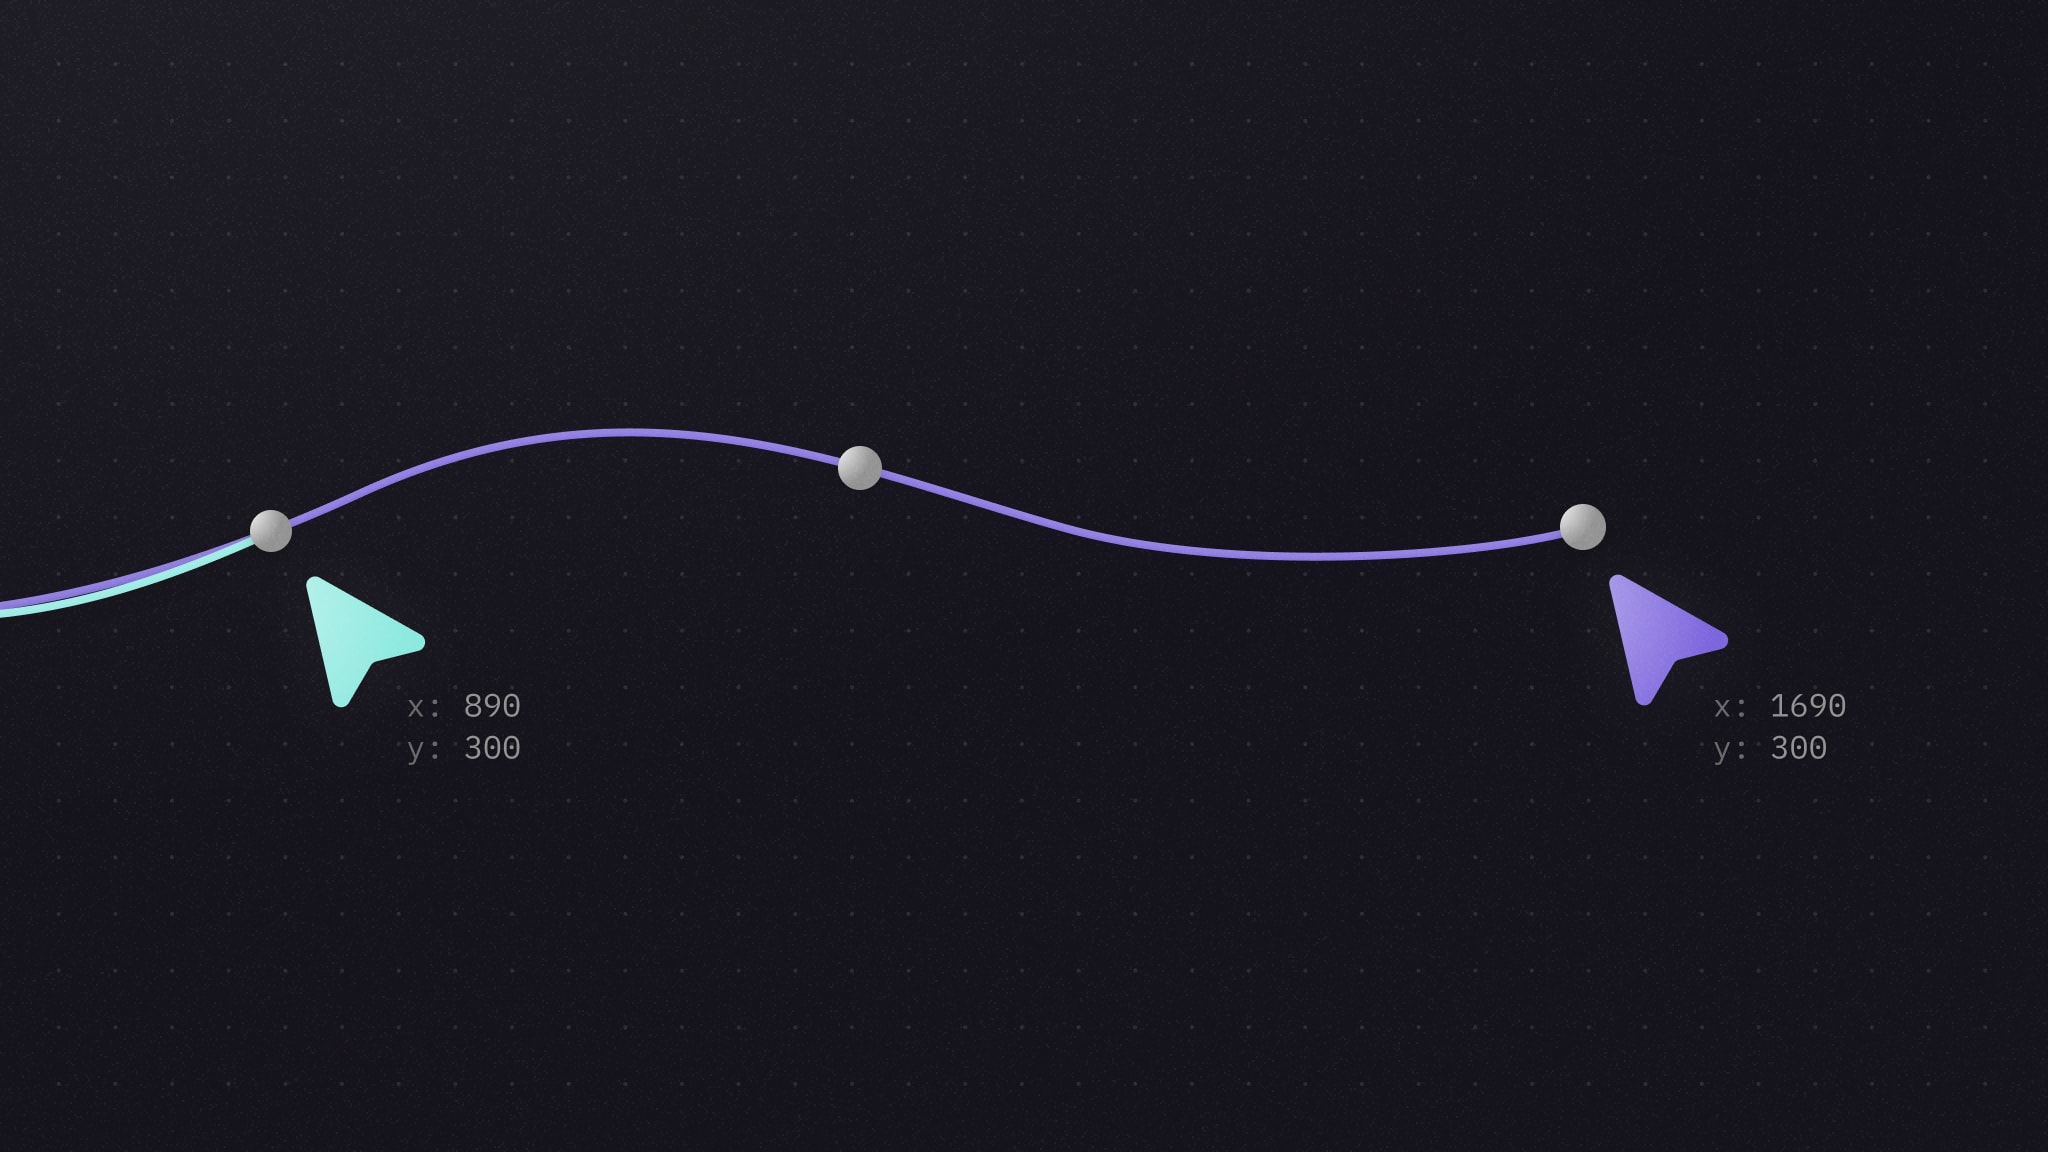
Spline interpolation is a method of constructing new points from a set of known
points, and plotting a smooth curve between. It’s often used to plot curves in
charts between discrete points of data.
An graph with points connected by a spline curve.
We can make use of spline interpolation to animate smooth paths for cursors,
relying on it using multiple different points to create a more accurate path.
There is a downside to this accuracy however—the function waits to receive
multiple points before rendering, so the cursor is slightly delayed.
An interactive demo displaying a cursor animated with splines.
You
Others
Spline animations take into account both the previous coordinates, and the next
coordinates, to create an accurate path that passes directly through every
point, unlike the other animation types.
An interactive diagram showing the path taken by a spline animated cursor,
alongside the original cursor's path.
Move slider
As you can tell, the path created isn’t 100% accurate—splines still struggle
with abrupt changes of direction—but it is much closer than any other method.
I’d recommend using spline-animated cursors where accuracy is preferred and a
little delay is acceptable. The easiest way to do this in React is with the
perfect‑cursors library, built
by the creator of
tldraw.
Now that we’ve taken a look the different animation methods, let’s see how they
perform side-by-side.
An interactive demo displaying all animated cursors at once.
You
Others
When we compare we can really start to notice the delay caused by spline
animations, and also, somewhat surprisingly, we can see just how similar CSS
transitions and spring animations are, despite springs feeling much more fluid.
An interactive diagram showing the paths taken by all different animated
cursors, alongside the original cursor's path.
Move slider
CSS transitions make for a quick-and-easy lightweight solution, whereas spring
and spline animations result in a smoother experience. Springs work smoothly,
but if you’re after accuracy, and responsiveness isn’t important, take a look
into splines!
This article covers the front end of live cursors, but what about the back end?
Implementing this is a much more difficult task, but it doesn’t have to be—you
can let Liveblocks handle your collaborative back end for you. We'll do all the
heavy lifting, so you can work on building your app.
Cursor positions, along with any other multiplayer data, can be sent across
clients with
updatePresence(),
part of the @liveblocks/client
package.
// Send cursor coordinates on movementfunctiononPointerMove(event){ room.updatePresence({cursor:{x: event.clientX,y: event.clientY,},});} // Remove cursor position when not on pagefunctiononPointerLeave(){ room.updatePresence({cursor:null,});}
Changes to other users’ presence can then be detected on clients using
subscribe("others").
// Callback runs on presence updatesroom.subscribe("others",(others)=>{// Array of objects containing user data others.toArray();});
We also have @liveblocks/react, a
special React package that simplifies rendering multiplayer components even
further. You can add
useOthers() which replaces
the subscription above:
We have working examples of live cursors built in a number of different
frameworks to get you started, have a try:
Next.js,
Vue,
Svelte,
Solid,
JavaScript.
Wait, really? This article is about live cursors, but these tips also apply to
other animated components in multiplayer environments, for example sticky notes
on a
collaborative whiteboard. We
have plenty of other fun examples too!